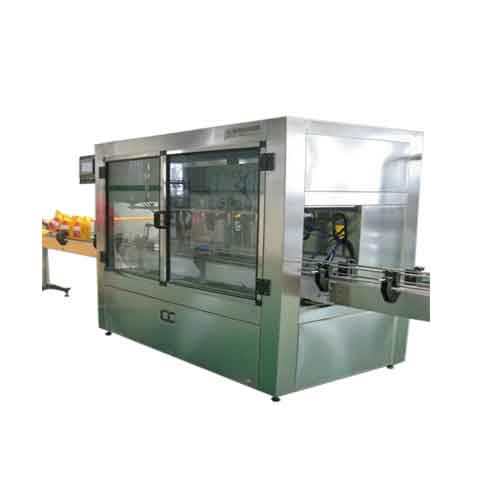
There is nothing more frustrating than watching a fully automatic bottle rinsing, filling, and capping machine come to an unexpected halt. Everything was running smoothly – bottles rinsed, water filled precisely, and caps tightened just right – until suddenly, production stops. Bottles jam, fill levels become inconsistent, and caps refuse to sit correctly. The team scrambles to fix the issue while production losses continue to rise. These disruptions can be costly and stressful, especially when deadlines loom and customers expect consistent quality.
Fortunately, most problems with rinsing, filling, and capping 3-in-1 bottled water filling machines are preventable and fixable. In this blog post, I will walk you through the most frequent issues operators face with these machines and provide step-by-step solutions to keep your production line running smoothly. By understanding what can go wrong and how to address it, you can minimize downtime, reduce product waste, and ensure your bottling line operates at peak efficiency. Let’s dive in and tackle the common challenges head-on so that you can keep your bottled water business flowing without interruption.

Table of Contents
· 1. Inconsistent Fill Levels – What Causes Them and How to Fix Them?
· 2. Bottle Jams and Misalignment – Why Do They Happen and What Can You Do?
· 3. Leaking Bottles During or After Filling – Causes and Solutions
· 4. Machine Downtime and Slow Production Speed – Common Culprits and Fixes
· 5. Capping Issues – Loose or Misaligned Caps and How to Resolve Them
· 6. Contamination Risks in the Rinsing System – Identifying and Eliminating Them
· 7. Conclusion – Keep Your Bottling Line Running Smoothly
The good news is that inconsistent fill levels usually stem from a few common, solvable causes. By identifying the root cause and applying the appropriate fix, you can restore accurate filling and ensure every bottle leaves your line at the correct volume. Below are some of the frequent reasons behind uneven fill levels and the steps you can take to resolve them.
1. Faulty Filling Valves or Nozzles: Worn seals, stuck components, or misadjusted filling valves can disrupt the smooth flow of water, leading to uneven dispensing. Over time, the rubber seals and O-rings inside the filling valve can degrade or accumulate debris, causing the valve to open or close inconsistently. This results in some bottles getting more water and others less.
How To Fix: Inspect the filling valves and nozzles for any signs of wear or blockage. Disassemble and clean the valve components thoroughly, and replace any worn or damaged parts (seals, O-rings, etc.) as needed. Properly lubricate moving parts and ensure the valves are adjusted according to the manufacturer’s specifications. Regularly cleaning the nozzles and valves can prevent buildup that affects performance.
2. Air Trapped in the Product Line: Air pockets in the water supply line can interrupt the flow and cause filling variations. When air gets into the line (for example, during a changeover or after maintenance), it creates bubbles that displace water, leading to inconsistent flow into the bottles.
How To Fix: If you suspect air in the line, purge it by running the machine and allowing the water to flow freely until all air is expelled. Many machines have a vent or bleed valve to release trapped air. Open this valve briefly to clear air from the system. Ensure the water supply tank or hopper remains full and that the pump is providing a steady flow to minimize air intake. Keeping the water level stable in the supply tank helps maintain consistent pressure and flow.
3. Product Viscosity or Temperature Changes: The thickness (viscosity) of the liquid can change with temperature, which might affect filling accuracy. While water is not viscous like juices or oils, temperature fluctuations can still impact its density and flow characteristics. For instance, colder water is slightly denser and may fill slightly slower or differently compared to warmer water.
How To Fix: Try to maintain a consistent water temperature during production. If your process involves heating or chilling the water, ensure the temperature is controlled within a narrow range. If you notice filling drifts when the temperature changes, you may need to adjust the machine’s fill time or volume settings to compensate. Keeping the water at a stable temperature (close to the calibration conditions) helps maintain repeatable fill levels.
4. Foaming or Splashing: Excessive foam or splashing during filling can throw off the machine’s ability to measure the correct fill level. If the water foams up inside the bottle, the machine’s sensors might misjudge the true liquid level, resulting in under- or over-filling. Foaming can be caused by the filling nozzle being too close to the bottle bottom, high flow rates, or even the water’s own properties (if it contains additives).
How To Fix: Reduce the filling speed or nozzle pressure to minimize turbulence and splashing. If the nozzle is adjustable, lower its height slightly so it’s not immersed deeply in the water (which can cause bubbles). Using a nozzle with an anti-foam design or adjusting the fill cycle timing can also help. In some cases, a small amount of defoamer (if safe for your product) can be introduced, but for bottled water, simply optimizing the fill process is usually sufficient. The goal is to ensure a smooth, laminar flow into the bottle to avoid air bubbles and sensor errors.
5. Level Sensor Malfunctions: The accuracy of the fill level sensor can be compromised by dirt, damage, or misalignment. Many modern filling machines use sensors (float sensors, optical sensors, or probes) to detect the water level in the bottle and stop the fill at the right point. If these sensors are faulty, they might misread the level, causing the machine to overfill or underfill.
How To Fix: First, check if the sensor is dirty or obstructed. Clean the sensor according to the manufacturer’s instructions (for example, wipe off any residue or scale that might affect its reading). If cleaning doesn’t help, the sensor may be misaligned – adjust its position so it correctly targets the fill level in the bottle. If the sensor is damaged or malfunctioning, it will likely need to be replaced. Calibrate or re-zero the sensor after any adjustment to ensure it reads the fill level accurately. Keeping sensors clean and in good working order is crucial for consistent fill levels.
6. Bottle Misalignment Under Nozzles: If bottles are not positioned correctly under the filling nozzles, it can lead to uneven fills. A misaligned bottle might receive an off-center stream of water, causing splashing or the nozzle to not fully insert, which affects accuracy. Inconsistent bottle positioning can also cause the nozzle to hit the bottle at an angle, leading to partial fills or overflow.
How To Fix: Inspect the conveyor and bottle guide rails to ensure bottles are centered and stable as they approach the filling station. Adjust the guides or star wheels (if used) so that each bottle is directly under the nozzle. Make sure the bottle in-feed timing is synchronized with the nozzle cycle – sometimes a timing adjustment is needed so the nozzle descends exactly when the bottle is in position. Proper alignment of the bottle under the nozzle ensures a consistent fill every time.

Understanding the common causes of bottle jams and misalignment is the first step in preventing them. Often, these issues stem from mechanical misalignments, worn parts, or variations in the bottles themselves. By addressing the root cause, you can significantly reduce the frequency of jams and keep your line running smoothly. Here are some of the typical reasons behind bottle jams and misalignment, along with practical solutions to fix them.
1. Deformed or Damaged Bottles: Bottles that are dented, cracked, or otherwise deformed are more prone to jamming in the machine. Weak or misshapen bottles may not feed smoothly through the conveyor or guides, and they can get stuck at transfer points. In extreme cases, a damaged bottle can even cause other bottles to misalign or fall, creating a chain reaction of jams.
How To Fix: The key here is quality control. Ensure you are using high-quality bottles from a reliable supplier to minimize the chance of defects. Inspect incoming bottles for any visible damage or irregularities before they go onto the line. If you notice a pattern of a certain type of bottle causing jams, consider adjusting the bottle design or using a different bottle mold. Removing any deformed bottles from the line as soon as they are detected can prevent a minor issue from escalating into a major jam.
2. Star Wheel or Guide Misalignment: Star wheels (rotary disks that advance bottles between stations) and conveyor guide rails must be precisely aligned to ensure smooth bottle movement. If a star wheel is slightly off-position or out of sync, it might not pick up bottles correctly or could push them into the wrong orientation. Similarly, if the guide rails are too wide or too narrow, bottles can wobble or get pinched. Even a small misalignment can accumulate over many cycles and eventually lead to a bottle jam.
How To Fix: Perform a thorough check of the star wheels and guide rails. Adjust the star wheel timing so that it picks up and releases bottles smoothly at each station. If needed, realign the guide rails to provide just enough clearance for the bottles without letting them rattle. Some machines have adjustable rails for different bottle sizes – make sure they are set correctly for the bottle you are running. Lubricating the star wheel shafts and ensuring they rotate freely can also help. Proper alignment and timing of these components will allow bottles to flow smoothly and reduce the chance of jams.
3. Conveyor Belt Issues: The conveyor belt is the lifeline of the bottling line, and any issues with it can cause misalignment or jams. A worn or slipping belt might not transport bottles at a consistent speed, leading to bunching or gaps between bottles. Belts that are off-track or too loose can allow bottles to drift sideways, potentially colliding with guides or other bottles. In some cases, a damaged belt (with cuts or tears) can even catch on a bottle and cause it to tip over.
How To Fix: Regularly inspect the conveyor belt for signs of wear, fraying, or damage. Replace the belt if it is worn out or has any tears that could snag bottles. Ensure the belt tension is correct – too loose and it might slip, too tight and it can put excessive strain on the drive. Align the belt properly so it runs centered on the rollers. If the belt has become misaligned over time, adjust the tracking to bring it back to the center. Keeping the conveyor in good condition and properly tensioned will help bottles glide smoothly and prevent them from getting stuck or misaligned.
4. Bottle Size Incompatibility: Sometimes, jams occur because the machine is set up for one bottle size and a different size is introduced. For example, switching from a 500 ml bottle to a 1 L bottle without adjusting the machine can lead to fits and starts. The star wheels, guides, and even filling nozzles might be optimized for a certain bottle height or diameter. Using the wrong bottle size can cause bottles to be too loose (wobbling) or too tight (getting stuck) in the system.
How To Fix: Always ensure the machine is set up for the specific bottle size you are running. If you change bottle sizes, take the time to reconfigure the machine accordingly. This may involve changing the guide rails, adjusting the star wheel pitch, or even changing the filling nozzle to one suited for the new bottle. Many 3-in-1 machines are designed to handle a range of sizes, but they still need the correct change parts for each size. Keeping the machine’s settings matched to the bottle in use is crucial for smooth operation and to avoid jams caused by size mismatches.
5. Poor Timing or Synchronization: In an automated line, precise timing between stations is essential. If the filling, capping, or rinsing cycles are not properly synchronized, bottles can collide or get caught in between stations. For instance, if a bottle exits the filling station just as the next bottle is arriving at the rinsing station, they might bump into each other. Similarly, if the capping head comes down too early or too late relative to the bottle’s arrival, it can cause the bottle to be misaligned or even knocked over. These timing issues can lead to jams and misaligned bottles throughout the line.
How To Fix: Use the machine’s timing controls to synchronize each station’s cycle. Many machines have adjustable timing cams or digital settings for the dwell time at each station. Check that the conveyor speed matches the cycle time of each station – the conveyor should move a bottle to the next station exactly when the previous station is done. If you notice bottles colliding or the line stalling, adjust the timing incrementally until the flow is smooth. It may take some trial and error, but achieving the right timing will greatly reduce the occurrence of jams due to out-of-sync operations.

Most leaks in a bottling line occur either during the filling process (when water spills or drips) or after the capping stage (when sealed bottles still leak). Identifying when and where the leak is happening is key to solving the problem. Below are common causes of leaking bottles and the steps you can take to fix them and prevent future leaks.
1. Filling Nozzle or Valve Leaks: If water is leaking from the filling nozzle itself (for example, dripping between fill cycles or after a fill), the issue is likely in the filling valve or nozzle assembly. A worn-out nozzle or a damaged seal can allow water to escape, leading to drips or even a steady leak. This not only wastes product but also makes the machine and floor wet.
How To Fix: Inspect the filling nozzles for any visible damage or wear. Often, the rubber or plastic tip of the nozzle can degrade over time or get nicked, causing a leak. Replace the nozzle if it is worn out. If the nozzle itself looks fine, the problem might be with the valve inside the nozzle. Disassemble the nozzle assembly and check the internal seals, O-rings, or valve seats. Rebuild or replace any faulty seals. In some cases, the nozzle might be slightly misaligned or loose – tightening the nozzle or adjusting its position can stop the leak. Regularly cleaning the nozzle can also help, as debris or residue buildup can cause a valve to not seat properly and lead to leaks.
2. Loose Caps (Under-tightening): One of the most common reasons bottles leak after capping is that the caps are not applied tightly enough. If a cap is too loose, water can seep out around the cap or even cause the cap to fall off during handling. Under-tightening can occur if the capping machine’s torque setting is too low or if there is an issue with the capping heads not applying enough pressure.
How To Fix: First, check the torque setting on your capping machine and increase it if necessary to ensure a secure seal. Torque is the measure of how much rotational force is used to tighten the cap. Refer to the machine’s manual or guidelines to find the recommended torque for the type of cap and bottle you are using. Make sure the machine is actually applying that torque (some machines have a torque tester to verify this). If the setting is correct but caps are still loose, inspect the capping heads or chucks for wear – worn grippers might not be holding the cap properly during tightening. In that case, replace the worn components. Also, ensure that the caps you are using are compatible with the machine and are not too large or too small for the bottle. Using the correct cap and torque combination will usually eliminate leaks due to loose caps.
3. Overtightened Caps: Surprisingly, caps that are too tight can also cause leaks. If a cap is over-tightened, it can crack the bottle’s neck or distort the cap’s seal, leading to micro-fractures or gaps that allow water to escape. Overtightening might happen if the torque setting is too high or if the machine has a fault causing it to apply excessive force.
How To Fix: Reduce the capping torque to a level that securely seals the cap without damaging the bottle. It may take some trial to find the sweet spot where the cap is tight enough to not leak, but not so tight that it risks breaking the bottle. If the machine allows, use a torque tester to measure the actual torque being applied and adjust accordingly. Also, check if the bottle neck can withstand the current torque – if you notice any neck cracks or cap deformation, it’s a sign to reduce the torque. Properly set torque will ensure a leak-proof seal without the risk of overtightening damage.
4. Cap Sealing Liner Issues: Sometimes, the cap itself might be the culprit. Caps often have a liner (a plastic or foam seal) inside that creates the seal on the bottle. If this liner is missing, damaged, or not making full contact, leaks can occur even if the cap is properly tightened. For example, a cap with a torn liner will leak, as will a cap that is cross-threaded (put on askew).
How To Fix: Inspect a sample of caps to ensure the liners are intact and present. If you find any caps with missing or damaged liners, switch to a new batch of caps. Ensure caps are not being reused or mishandled in a way that could damage the liner. Also, make sure the capping machine is not applying the cap in a way that damages the liner – some machines have features to align and seat the cap gently before tightening. If cross-threading is an issue, check the cap alignment and the machine’s cap tightening mechanism (for example, on a spindle capper, ensure the spindle wheels are aligned correctly on the cap). Using quality caps and ensuring they are properly seated will go a long way in preventing leaks due to cap liner problems.
5. Bottle Neck Defects: In some cases, the bottle itself is the source of the leak. A bottle with a chipped, cracked, or otherwise imperfect neck finish will not provide a good surface for the cap to seal against. Even a small crack can allow water to seep out, and a rough or uneven neck might prevent the cap from sealing properly.
How To Fix: Remove any bottles with visible neck defects from the production line. If you notice a recurring issue with a particular batch of bottles, it might indicate a problem in the bottle manufacturing process (for example, the mold is worn and creating imperfect necks). In that case, work with your bottle supplier to improve the bottle quality. On the machine side, ensure that the caps are not being forced onto bottles with extreme force that could damage them – a properly adjusted capping machine should not be cracking bottle necks. Also, consider if the bottles are being subjected to any impacts or stress after filling (for example, during conveyance or packing) that could cause cracks. Addressing the bottle quality and handling will eliminate leaks caused by bottle defects.
6. Product Residue on Bottle Threads: If water from the filling process drips onto the bottle’s neck or threads, it can interfere with the capping process. A wet or slippery bottle neck can prevent the cap from gripping and sealing correctly, leading to leaks. This often happens if the filling nozzles are dripping excessively or if bottles are overfilled, causing water to spill onto the neck during the capping stage.
How To Fix: First, address any nozzle dripping issues (as discussed in the “Inconsistent Fill Levels” section) to ensure the filling process is clean and precise. Make sure the filling nozzles are not dripping after each fill cycle. You can also install drip trays or use a nozzle with an anti-drip feature to catch any stray drops. Additionally, check that the conveyor and any bottle guides are dry and not spreading water onto the bottle necks. If necessary, add a brief air blow or rinse step before capping to dry the bottle necks. Ensuring the bottle neck and threads are dry and clean when the cap is applied will help the cap seat properly and create a leak-free seal.
The good news is that many of the causes of downtime and slow speed are preventable or easily corrected with some troubleshooting and maintenance. By systematically identifying the issue, you can get your machine running at full speed again. Below are some common problems that lead to downtime or reduced production speed and the steps you can take to resolve them.
1. Machine Not Starting or Sudden Stops: If the bottling machine fails to start or stops mid-production, it can bring everything to a halt. This issue is often related to electrical or safety system faults. For example, a tripped circuit breaker, a loose power connection, or a blown fuse can prevent the machine from powering up. Safety interlocks might remain engaged if an access panel or emergency stop button hasn’t been reset properly. In other cases, the machine might start but then stop abruptly – this could be due to a fault detection (such as a sensor seeing something wrong) or an overload situation.
How To Fix: First, check the basics: ensure the main power switch is on, and reset any tripped breakers or replace any blown fuses. Verify that all safety doors, panels, and emergency stop buttons are in the correct position. If the machine has a display, note any error codes or messages – these can point to the problem. For instance, an error like “Air Pressure Low” or “Sensor Fault” will indicate which system to check. Clear the error and reset the machine once the issue is resolved. If the machine still won’t start, inspect the electrical components for any signs of damage (burnt wires, failed contactors, etc.). In some cases, the problem might be with the machine’s control system (PLC or relays) – ensure they are functioning correctly. Addressing the root cause of the startup or stop fault will get the machine running again. It’s also a good idea to keep spare fuses and contact relays on hand so you can quickly replace any that fail.
2. Air Pressure or Pneumatic Issues: Many functions of a bottling machine (such as valve actuation, capping head movement, or bottle ejection) are powered by compressed air. If the air pressure drops below the required level, the machine may slow down or stop altogether to prevent damage or errors. Low pressure can cause valves to open slowly, cylinders to move sluggishly, or the machine to trigger a low-pressure safety shutdown.
How To Fix: Check the air pressure gauge on the machine or the main air supply. If it’s below the recommended range, increase the air supply pressure or investigate why pressure has dropped (for example, a leak in the air lines or a problem with the air compressor). Make sure all air filters and dryers are clear – a clogged filter can restrict airflow and reduce pressure. Also, ensure that any pneumatic valves are fully opening and closing. If the machine has an air pressure sensor, verify it is working correctly – sometimes a faulty sensor can cause the machine to err on the side of caution and stop. Maintaining a steady supply of clean, dry air at the correct pressure is crucial for the machine to operate at its intended speed.
3. Worn or Faulty Sensors: Sensors play a big role in automating the bottling process – they detect bottle presence, fill levels, cap placement, and more. If a sensor is dirty, misaligned, or malfunctioning, the machine might not receive the correct signal to proceed, leading to pauses or slower operation as the machine tries to compensate. For example, a faulty bottle presence sensor might cause the machine to wait longer for a bottle that isn’t there, or a misaligned fill level sensor might cause the machine to repeatedly retry filling, effectively reducing speed.
How To Fix: Inspect all critical sensors on the machine. Clean any that are dirty or obstructed (for instance, a photoelectric sensor with dust on its lens might not detect bottles accurately). Check the alignment of each sensor – ensure it is positioned to properly “see” what it needs to detect. If a sensor is damaged or giving false readings, it will likely need to be replaced. Sometimes, a simple adjustment of the sensor’s sensitivity or position can solve the problem. Also, make sure the sensor cables and connections are secure – a loose wire can cause intermittent faults. Keeping sensors in good working order will prevent the kind of erratic behavior that slows down or stops the machine.
4. Electrical Control System Faults: The machine’s control system (often a PLC, or programmable logic controller) orchestrates all the sequences and timing. If there’s an issue in the control system – such as a program glitch, a faulty relay, or a problem with the human-machine interface (HMI) – the machine may behave unpredictably or halt. Modern bottling machines are quite complex, and even a small software error or a stuck relay can cause a system-wide stop.
How To Fix: If you suspect a control system issue, first try resetting the machine (turn it off and wait a few seconds before turning it back on). This can sometimes clear a temporary glitch. Check the HMI for any error messages or alarms that indicate which part of the system is faulting. If a specific error code is displayed, consult the machine’s manual or technical support for guidance on resolving it. Ensure that all the relays and contactors in the control panel are functioning – listen for any that are chattering (constantly clicking on and off), which can indicate a problem. In some cases, you might need to reload the machine’s software or firmware if it’s become corrupted. It’s wise to keep a backup of the machine’s program and settings. If you’re not experienced with the control system, this might be a job for a qualified technician. Resolving any control system faults will get the machine running reliably again.
5. Mechanical Wear or Damage: Over time, the moving parts of a bottling machine can wear out or break, which can lead to slowdowns or stops as the machine struggles to operate properly. Worn bearings, belts that are slipping or off-track, gears that are grinding, or chains that are loose can all reduce the machine’s efficiency and even cause safety shutdowns if a fault is detected. Sometimes a mechanical issue might not stop the machine but will cause it to run slower – for example, a worn conveyor belt drive might not move bottles at the set speed.
How To Fix: Perform a thorough inspection of the machine’s mechanical components. Look and listen for signs of wear or damage: unusual noises, vibration, or parts that are hot to the touch can indicate a problem. Tighten any loose bolts or fasteners and lubricate all moving parts as recommended by the manufacturer. Replace any parts that are worn out or broken – for instance, a worn belt, a damaged bearing, or a stretched chain should be replaced promptly to prevent further issues. Ensure that all guards and safety devices are in place and functioning, as sometimes a machine will stop if it detects a safety issue (like a guard being open). Regular preventive maintenance (which we’ll discuss in the next section) is key to catching mechanical problems before they cause downtime. By keeping the machine’s mechanical system in good shape, you can maintain its speed and reliability.
6. Overloading or Incorrect Settings: Sometimes, the machine itself is fine, but it’s being pushed beyond its capabilities or set up incorrectly. If you try to run the machine at a speed higher than it’s designed for, or if you try to fill/cap a product or container that the machine isn’t suited for, it can lead to issues. For example, using a machine rated for 5000 bottles per hour (BPH) and trying to run it at 6000 BPH might cause it to frequently jam or overheat, or simply not keep up. Similarly, if the machine is set up with the wrong parameters (like a fill time that’s too short for the volume, leading to underfilled bottles triggering a fault), it will struggle.
How To Fix: Make sure you are operating within the machine’s design specifications. Check the manual or the machine’s data plate for the maximum rated speed and other limitations. If you need higher output, you might need a faster machine or to run two lines. Adjust the machine’s settings to match the product and container you are using. This might involve increasing fill times, adjusting sensor settings, or changing timing. It’s also important to ensure the product supply (water in this case) can keep up with the machine’s speed – a lag in supply can cause the machine to wait and slow down. Optimizing the setup for your specific production needs will help the machine run smoothly and at its best speed.

Most capping issues fall into two categories: caps that are too loose (under-tightened) and caps that are not aligned correctly (misaligned). Both can usually be traced back to a few common causes. Let’s examine these issues and the solutions to fix them so that every bottle leaves your line with a secure, straight cap.
1. Loose Caps (Under-tightening): If caps are coming off bottles too easily or are noticeably loose, the capping machine is not applying enough torque. Under-tightening can happen for a number of reasons. The torque setting on the capping head might be too low for the type of cap or bottle being used. Alternatively, the capping head or gripper mechanism could be worn – for example, on a spindle capper, the spindle wheels or belts might be worn and not gripping the cap properly to tighten it effectively. Another possibility is that the caps themselves are the wrong size or material, making them hard to grip or too slippery.
How To Fix: Start by checking and adjusting the torque setting. Increase the torque gradually (if the machine allows incremental adjustment) and test a few bottles to see if the caps are now tight enough. Be careful not to overtighten (as we’ll discuss next). If adjusting torque doesn’t solve the problem, inspect the capping mechanism for wear. On a chuck capper, ensure the chuck jaws or inserts are not worn out – replace them if they are. On a spindle capper, check the condition of the spindle wheels and the gripper belts. Worn spindle wheels or belts can slip on the cap and not apply enough rotation force. Replace any worn components. Also, verify that the caps being used are compatible with the machine. For instance, if the caps are too large in diameter, the capping heads might not be able to grip them correctly. Switching to the correct cap size or type can resolve grip issues. By ensuring the capping machine has the right torque and is in good working order, you can eliminate loose caps.
2. Overtightened Caps (Crushing or Breakage): On the flip side, if caps are applied too tight, it can cause the bottle neck to crack or the cap itself to deform or break. Overtightening often happens when the torque setting is too high or if there’s a fault in the capping machine causing it to apply excessive force (for example, a capping head that comes down too far and keeps tightening). Caps that are too tight can also be difficult for consumers to open, which is a quality issue.
How To Fix: Reduce the capping torque to a level that securely seals the cap without damaging the bottle or cap. If the machine has a torque limiter or adjustment, dial it down. It may take some trial to find the optimal torque where the cap is tight enough to not leak, but not so tight that it risks cracking the bottle. Also, check if the machine is applying the cap in a way that could crush it – for instance, on a screw-cap capper, ensure the head isn’t coming down with too much vertical force. Sometimes, a mechanical adjustment (like a spring tension or a pressure setting) can help. If the machine is consistently overtightening caps, it might indicate a problem with the torque control system (if equipped) – have a technician check its calibration. Properly set torque and a gentle capping motion will give you a secure seal without the risk of damage.
3. Misaligned or Crooked Caps: Caps that are not centered on the bottle or are installed at an angle can occur for several reasons. One common cause is that the bottles themselves are not aligned correctly under the capping head – if a bottle is slightly askew when the cap is applied, the cap will end up crooked. This can happen if the conveyor or bottle in-feed isn’t delivering bottles straight, or if there’s a timing issue (the capping head descends before the bottle is fully seated). Another cause could be the cap feeder or orienter – if caps are not being presented to the capping head in the correct orientation (for example, a cap is slightly tilted as it’s picked up), it can lead to a misaligned cap. Additionally, on certain capping machines, the mechanism that holds the bottle during capping (such as a bottle guide or a neck ring) might be out of adjustment, allowing the bottle to shift during capping.
How To Fix: First, ensure the bottles are being fed to the capping station straight and consistently. Adjust the conveyor guides or the timing of the bottle in-feed to eliminate any wobbling or misalignment of bottles before they reach the capper. If the machine has a bottle necking or positioning device, check that it is holding the bottle steady. Next, inspect the cap feeder and any cap orienting components. Make sure caps are being oriented correctly (for example, for a screw cap, ensure the threads are aligned as the cap is picked up). Some machines have sensors or sorters to ensure caps are aligned – if your machine has these, verify they are working. If caps are frequently getting crooked, consider adding or adjusting a cap alignment system to guide caps into the correct orientation before capping. Finally, check the capping head itself – if it’s a spindle capper, ensure the spindle wheels are centered on the cap. If it’s a chuck capper, make sure the chuck is descending straight and not at an angle. Sometimes a simple adjustment of the capping head’s position or alignment can fix crooked caps. By aligning both the bottle and the cap delivery, you can achieve straight, properly seated caps every time.
4. Cap Feeding Issues: If caps are not being fed to the capping head reliably – for example, the cap hopper is emptying frequently, or caps are getting stuck in the chute – this can cause the capping process to pause or lead to issues like a cap being applied late or not at all. Cap feeding problems can stem from a faulty cap feeder mechanism, caps of the wrong size or shape, or debris in the cap track.
How To Fix: Check the cap hopper and feeder for any obstructions or wear. Clear any stuck caps and ensure the feeder is dispensing caps smoothly. If the feeder is vibrating or using air to move caps, adjust the settings to improve cap flow. Inspect the caps themselves – ensure they are not deformed or too large/small for the feeder tracks. Sometimes a cap with a slightly different shape (like a taller cap) can cause feeding issues. If needed, adjust the feeder’s guides or change parts to accommodate the cap. Also, make sure the cap hopper is being replenished regularly to avoid running out of caps mid-production. A steady, reliable feed of caps is essential for consistent capping. By troubleshooting the cap feeding system, you can prevent pauses and ensure a cap is always ready when the bottle is in position.
5. Worn or Faulty Capping Heads: Over time, the capping heads or chucks can wear out, which affects their ability to grip and apply caps correctly. For example, on a rotary capping head, the gripping fingers or inserts might become worn and not hold the cap securely during tightening. On a spindle capper, the spindle wheels can wear down and not grip the cap’s surface effectively, leading to slipping. Worn parts can cause both loose caps (if the grip is insufficient) and misaligned caps (if the cap isn’t held steady).
How To Fix: Inspect the capping heads for wear. Look for signs like worn gripping surfaces, cracks, or excessive play in the mechanism. Replace any worn components – many machines have replaceable inserts or pads for this very purpose. Lubricate any moving parts of the capping head (as recommended by the manufacturer) to ensure smooth operation. If the capping head is adjustable (for example, tension springs on the grippers), make sure they are set correctly to provide a firm grip. Regularly checking and maintaining the capping heads will ensure they continue to perform well. It’s also a good idea to keep spare capping head parts on hand so you can replace them quickly when needed, minimizing downtime.

Most rinsing systems in modern bottling lines use a combination of water and sometimes air to clean the inside of bottles. Common issues that can lead to contamination include inadequate filtration of the rinse water, bacterial growth in the water system, or simply not following proper cleaning and sanitation procedures. Let’s explore these contamination risks in more detail and discuss how to identify and eliminate them to keep your bottling line hygienic.
1. Poor Water Filtration: The rinse water must be filtered to remove any particles, sediment, or impurities that could be deposited onto the bottles. If the filtration system is not functioning properly – for example, the filters are clogged or not the correct micron rating – contaminants can pass through and end up in the bottles. Even seemingly small particles can cause cloudiness or off-tastes in the bottled water, and larger debris could be a safety concern.
How To Fix: Regularly check and replace the filters in the rinsing system. If you notice any particles or sediment in the rinse water, change the filters immediately. It’s wise to establish a preventive maintenance schedule for filter changes based on the quality of your water source and production volume. Ensure the filtration system is rated for the level of purity you need – for example, using a 5-micron or finer filter if necessary. In some cases, you might need multiple stages of filtration (like a sediment filter followed by a carbon filter) if your water has specific contaminants. By keeping the rinse water clean, you prevent contaminants from being introduced in the first place.
2. Bacterial Growth in the Water System: Stagnant or untreated water in the rinsing system can become a breeding ground for bacteria and mold. Even though you are filling bottled water (which is usually disinfected), the rinse water itself could harbor microbes if not managed. Bacterial growth can occur in any part of the system where water sits for a long time – for instance, in a storage tank or in the lines between uses. If bacteria are present, they can be transferred to the bottles during rinsing, potentially causing product spoilage or health issues.
How To Fix: Implement a regular sanitization cycle for the rinsing system. Many bottling lines have a Clean-in-Place (CIP) system that circulates a sanitizing solution (like a mild peracetic acid or chlorine solution) through the rinsing circuit. Run this cycle as often as recommended – typically at the end of each production day or at least weekly, depending on usage. Ensure the sanitizing solution is at the correct concentration and contact time to effectively kill any bacteria. Also, try to avoid letting water sit stagnant in the system for extended periods. If the line is not going to be used for a while, drain the water or circulate a sanitizing solution before storing it. Some systems also use UV sterilizers or ozone to continuously disinfect the rinse water – if your system has these, make sure they are functioning. By keeping the rinse water and system sanitized, you eliminate the risk of bacterial contamination.
3. Improper Cleaning Cycles: Sometimes, the issue isn’t with the water itself but with the cleaning process not being thorough. If the rinsing machine is not cleaned or purged correctly between production runs, residues from previous products (if you’re doing different products) or biofilms can build up and contaminate the next batch. Even in a pure water filling line, a lack of regular cleaning can lead to a gradual buildup of mineral scale or algae in the nozzles or tanks, which then can slough off into the bottles.
How To Fix: Follow a strict cleaning and sanitation schedule for the rinsing machine. This should include purging the system with clean water, running a sanitizing solution, and then a final rinse with clean water to remove any sanitizer residue. Make sure to clean all parts that come in contact with the water or bottles – nozzles, tanks, pipes, and any filters. Pay special attention to the nozzles – disassemble and clean them if necessary to remove any buildup. Also, ensure the machine’s exterior and any areas where bottles are handled are kept clean to prevent cross-contamination. By properly cleaning the rinsing system, you prevent any residues or microorganisms from carrying over to your product.
4. Bottle Quality and Handling: The condition of the bottles before they even reach the rinsing stage can impact contamination. Bottles that are stored uncovered can collect dust and debris on their exteriors or even have contaminants inside if they were not properly sealed after manufacturing. If these dirty bottles are then rinsed, the rinsing process might not be enough to remove all the contaminants, especially if the bottles are very dirty. Additionally, if bottles are mishandled and caps are removed (for instance, caps falling off and the bottle being open to the environment), they can get contaminated.
How To Fix: Ensure bottles are stored in a clean, covered environment before use. If possible, keep them in their original packaging until they go onto the line. Inspect bottles as they are loaded onto the conveyor – if any look excessively dirty or have open caps, remove them. You might also consider an additional pre-rinse or air blow step for the outside of bottles if dust is a persistent issue. On the handling side, make sure any conveyors or equipment that the bottles travel on are clean and not introducing dirt. For example, clean conveyor belts and guides regularly to remove any dust or residue. By starting with clean bottles and handling them hygienically, you reduce the load on the rinsing system and prevent contamination from the bottle itself.
5. Water Quality Issues: The source of the rinse water itself could be a source of contamination if it’s not up to standards. If the water has high levels of bacteria, sediments, or chemicals, the rinsing process could actually be adding contaminants rather than removing them. For example, using water that hasn’t been properly treated or filtered could introduce bacteria or off-tastes.
How To Fix: Test the rinse water quality regularly. If you are using the same water as the product (which is common), ensure it meets your product’s purity standards. If you are using a different water source for rinsing (like tap water), it should at least be filtered and perhaps treated to ensure it’s clean. In some cases, you might need to install a water treatment system for the rinse water (such as a UV sterilizer or additional filtration). Also, be mindful of the water’s chemical composition – for instance, water with a high mineral content might leave scale or deposits. Using purified water (like deionized or RO water) for rinsing can eliminate many water quality issues. By controlling the water quality, you ensure that the only thing the rinsing process introduces to the bottles is cleanliness.
Union Machinery has been engaged in food machinery customization services since its establishment in 2014, according to customer needs for you to tailor suitable machinery and equipment, for more product information, please refer to: Bottled Water Filling Machine;More video information see view: Bottled Water Production Line 、PET Bottled Water Production Line. Our expertise and advantages will bring you more opportunities and development space.
For personalized, industry-tailored advice and to explore state-of-the-art solutions, please don't hesitate to contact us at info@unmachinery.com
The following is other knowledge related to Bottled Water Filling Production Line that I have summarized based on long-term work experience, for your reference. I hope it will be helpful to you.
1.How to Design a PET Bottled Water Production Line?
2.How is PET bottled purified water filled?
3.What Are the Advantages of 3-in-1 Bottled Water Filling Machines?
Fortunately, most problems with rinsing, filling, and capping 3-in-1 bottled water filling machines are preventable and fixable. In this blog post, I will walk you through the most frequent issues operators face with these machines and provide step-by-step solutions to keep your production line running smoothly. By understanding what can go wrong and how to address it, you can minimize downtime, reduce product waste, and ensure your bottling line operates at peak efficiency. Let’s dive in and tackle the common challenges head-on so that you can keep your bottled water business flowing without interruption.
Table of Contents
· 1. Inconsistent Fill Levels – What Causes Them and How to Fix Them?
· 2. Bottle Jams and Misalignment – Why Do They Happen and What Can You Do?
· 3. Leaking Bottles During or After Filling – Causes and Solutions
· 4. Machine Downtime and Slow Production Speed – Common Culprits and Fixes
· 5. Capping Issues – Loose or Misaligned Caps and How to Resolve Them
· 6. Contamination Risks in the Rinsing System – Identifying and Eliminating Them
· 7. Conclusion – Keep Your Bottling Line Running Smoothly
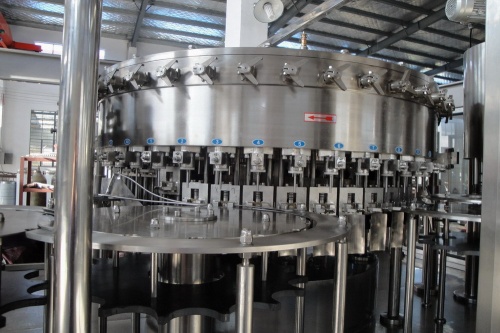
Inconsistent Fill Levels – What Causes Them and How to Fix Them?
Inconsistent fill levels are one of the most noticeable and frustrating problems in a bottling line. Bottles that are underfilled or overfilled can lead to customer complaints, regulatory compliance issues, and wasted product. Imagine running a high-speed production line and discovering that a batch of bottles has varying water levels – it not only looks unprofessional but also creates quality concerns. This issue can quickly erode trust in your brand and result in costly product rework or recalls if not addressed promptly.The good news is that inconsistent fill levels usually stem from a few common, solvable causes. By identifying the root cause and applying the appropriate fix, you can restore accurate filling and ensure every bottle leaves your line at the correct volume. Below are some of the frequent reasons behind uneven fill levels and the steps you can take to resolve them.
1. Faulty Filling Valves or Nozzles: Worn seals, stuck components, or misadjusted filling valves can disrupt the smooth flow of water, leading to uneven dispensing. Over time, the rubber seals and O-rings inside the filling valve can degrade or accumulate debris, causing the valve to open or close inconsistently. This results in some bottles getting more water and others less.
How To Fix: Inspect the filling valves and nozzles for any signs of wear or blockage. Disassemble and clean the valve components thoroughly, and replace any worn or damaged parts (seals, O-rings, etc.) as needed. Properly lubricate moving parts and ensure the valves are adjusted according to the manufacturer’s specifications. Regularly cleaning the nozzles and valves can prevent buildup that affects performance.
2. Air Trapped in the Product Line: Air pockets in the water supply line can interrupt the flow and cause filling variations. When air gets into the line (for example, during a changeover or after maintenance), it creates bubbles that displace water, leading to inconsistent flow into the bottles.
How To Fix: If you suspect air in the line, purge it by running the machine and allowing the water to flow freely until all air is expelled. Many machines have a vent or bleed valve to release trapped air. Open this valve briefly to clear air from the system. Ensure the water supply tank or hopper remains full and that the pump is providing a steady flow to minimize air intake. Keeping the water level stable in the supply tank helps maintain consistent pressure and flow.
3. Product Viscosity or Temperature Changes: The thickness (viscosity) of the liquid can change with temperature, which might affect filling accuracy. While water is not viscous like juices or oils, temperature fluctuations can still impact its density and flow characteristics. For instance, colder water is slightly denser and may fill slightly slower or differently compared to warmer water.
How To Fix: Try to maintain a consistent water temperature during production. If your process involves heating or chilling the water, ensure the temperature is controlled within a narrow range. If you notice filling drifts when the temperature changes, you may need to adjust the machine’s fill time or volume settings to compensate. Keeping the water at a stable temperature (close to the calibration conditions) helps maintain repeatable fill levels.
4. Foaming or Splashing: Excessive foam or splashing during filling can throw off the machine’s ability to measure the correct fill level. If the water foams up inside the bottle, the machine’s sensors might misjudge the true liquid level, resulting in under- or over-filling. Foaming can be caused by the filling nozzle being too close to the bottle bottom, high flow rates, or even the water’s own properties (if it contains additives).
How To Fix: Reduce the filling speed or nozzle pressure to minimize turbulence and splashing. If the nozzle is adjustable, lower its height slightly so it’s not immersed deeply in the water (which can cause bubbles). Using a nozzle with an anti-foam design or adjusting the fill cycle timing can also help. In some cases, a small amount of defoamer (if safe for your product) can be introduced, but for bottled water, simply optimizing the fill process is usually sufficient. The goal is to ensure a smooth, laminar flow into the bottle to avoid air bubbles and sensor errors.
5. Level Sensor Malfunctions: The accuracy of the fill level sensor can be compromised by dirt, damage, or misalignment. Many modern filling machines use sensors (float sensors, optical sensors, or probes) to detect the water level in the bottle and stop the fill at the right point. If these sensors are faulty, they might misread the level, causing the machine to overfill or underfill.
How To Fix: First, check if the sensor is dirty or obstructed. Clean the sensor according to the manufacturer’s instructions (for example, wipe off any residue or scale that might affect its reading). If cleaning doesn’t help, the sensor may be misaligned – adjust its position so it correctly targets the fill level in the bottle. If the sensor is damaged or malfunctioning, it will likely need to be replaced. Calibrate or re-zero the sensor after any adjustment to ensure it reads the fill level accurately. Keeping sensors clean and in good working order is crucial for consistent fill levels.
6. Bottle Misalignment Under Nozzles: If bottles are not positioned correctly under the filling nozzles, it can lead to uneven fills. A misaligned bottle might receive an off-center stream of water, causing splashing or the nozzle to not fully insert, which affects accuracy. Inconsistent bottle positioning can also cause the nozzle to hit the bottle at an angle, leading to partial fills or overflow.
How To Fix: Inspect the conveyor and bottle guide rails to ensure bottles are centered and stable as they approach the filling station. Adjust the guides or star wheels (if used) so that each bottle is directly under the nozzle. Make sure the bottle in-feed timing is synchronized with the nozzle cycle – sometimes a timing adjustment is needed so the nozzle descends exactly when the bottle is in position. Proper alignment of the bottle under the nozzle ensures a consistent fill every time.
Bottle Jams and Misalignment – Why Do They Happen and What Can You Do?
A single bottle jam can bring an entire production line to a grinding halt. You might have experienced the scenario: a bottle gets stuck in the conveyor or at a station, and suddenly the whole line stops. Bottles pile up or fall over, and the machine’s safety system triggers a shutdown. These jams are not only inconvenient but can also damage bottles or machine components if not handled quickly. Misaligned bottles – those that are slightly askew or not properly oriented – can cause issues like uneven filling, capping errors, or even breakage, leading to lost product and potential safety hazards.Understanding the common causes of bottle jams and misalignment is the first step in preventing them. Often, these issues stem from mechanical misalignments, worn parts, or variations in the bottles themselves. By addressing the root cause, you can significantly reduce the frequency of jams and keep your line running smoothly. Here are some of the typical reasons behind bottle jams and misalignment, along with practical solutions to fix them.
1. Deformed or Damaged Bottles: Bottles that are dented, cracked, or otherwise deformed are more prone to jamming in the machine. Weak or misshapen bottles may not feed smoothly through the conveyor or guides, and they can get stuck at transfer points. In extreme cases, a damaged bottle can even cause other bottles to misalign or fall, creating a chain reaction of jams.
How To Fix: The key here is quality control. Ensure you are using high-quality bottles from a reliable supplier to minimize the chance of defects. Inspect incoming bottles for any visible damage or irregularities before they go onto the line. If you notice a pattern of a certain type of bottle causing jams, consider adjusting the bottle design or using a different bottle mold. Removing any deformed bottles from the line as soon as they are detected can prevent a minor issue from escalating into a major jam.
2. Star Wheel or Guide Misalignment: Star wheels (rotary disks that advance bottles between stations) and conveyor guide rails must be precisely aligned to ensure smooth bottle movement. If a star wheel is slightly off-position or out of sync, it might not pick up bottles correctly or could push them into the wrong orientation. Similarly, if the guide rails are too wide or too narrow, bottles can wobble or get pinched. Even a small misalignment can accumulate over many cycles and eventually lead to a bottle jam.
How To Fix: Perform a thorough check of the star wheels and guide rails. Adjust the star wheel timing so that it picks up and releases bottles smoothly at each station. If needed, realign the guide rails to provide just enough clearance for the bottles without letting them rattle. Some machines have adjustable rails for different bottle sizes – make sure they are set correctly for the bottle you are running. Lubricating the star wheel shafts and ensuring they rotate freely can also help. Proper alignment and timing of these components will allow bottles to flow smoothly and reduce the chance of jams.
3. Conveyor Belt Issues: The conveyor belt is the lifeline of the bottling line, and any issues with it can cause misalignment or jams. A worn or slipping belt might not transport bottles at a consistent speed, leading to bunching or gaps between bottles. Belts that are off-track or too loose can allow bottles to drift sideways, potentially colliding with guides or other bottles. In some cases, a damaged belt (with cuts or tears) can even catch on a bottle and cause it to tip over.
How To Fix: Regularly inspect the conveyor belt for signs of wear, fraying, or damage. Replace the belt if it is worn out or has any tears that could snag bottles. Ensure the belt tension is correct – too loose and it might slip, too tight and it can put excessive strain on the drive. Align the belt properly so it runs centered on the rollers. If the belt has become misaligned over time, adjust the tracking to bring it back to the center. Keeping the conveyor in good condition and properly tensioned will help bottles glide smoothly and prevent them from getting stuck or misaligned.
4. Bottle Size Incompatibility: Sometimes, jams occur because the machine is set up for one bottle size and a different size is introduced. For example, switching from a 500 ml bottle to a 1 L bottle without adjusting the machine can lead to fits and starts. The star wheels, guides, and even filling nozzles might be optimized for a certain bottle height or diameter. Using the wrong bottle size can cause bottles to be too loose (wobbling) or too tight (getting stuck) in the system.
How To Fix: Always ensure the machine is set up for the specific bottle size you are running. If you change bottle sizes, take the time to reconfigure the machine accordingly. This may involve changing the guide rails, adjusting the star wheel pitch, or even changing the filling nozzle to one suited for the new bottle. Many 3-in-1 machines are designed to handle a range of sizes, but they still need the correct change parts for each size. Keeping the machine’s settings matched to the bottle in use is crucial for smooth operation and to avoid jams caused by size mismatches.
5. Poor Timing or Synchronization: In an automated line, precise timing between stations is essential. If the filling, capping, or rinsing cycles are not properly synchronized, bottles can collide or get caught in between stations. For instance, if a bottle exits the filling station just as the next bottle is arriving at the rinsing station, they might bump into each other. Similarly, if the capping head comes down too early or too late relative to the bottle’s arrival, it can cause the bottle to be misaligned or even knocked over. These timing issues can lead to jams and misaligned bottles throughout the line.
How To Fix: Use the machine’s timing controls to synchronize each station’s cycle. Many machines have adjustable timing cams or digital settings for the dwell time at each station. Check that the conveyor speed matches the cycle time of each station – the conveyor should move a bottle to the next station exactly when the previous station is done. If you notice bottles colliding or the line stalling, adjust the timing incrementally until the flow is smooth. It may take some trial and error, but achieving the right timing will greatly reduce the occurrence of jams due to out-of-sync operations.
Leaking Bottles During or After Filling – Causes and Solutions
Leaking bottles are a messy and potentially costly problem in any bottling operation. Water leaking from bottles can create slip hazards, contaminate the machine and surrounding area, and waste product. Even worse, leaks indicate that the product’s integrity is compromised – if a bottle leaks during storage or transport, the entire product could be lost or become unsafe for consumption. Customers receiving a leaky bottle will be unhappy, and repeated leaks can damage your brand’s reputation. It’s crucial to address any leaks as soon as they are noticed to prevent bigger issues down the line.Most leaks in a bottling line occur either during the filling process (when water spills or drips) or after the capping stage (when sealed bottles still leak). Identifying when and where the leak is happening is key to solving the problem. Below are common causes of leaking bottles and the steps you can take to fix them and prevent future leaks.
1. Filling Nozzle or Valve Leaks: If water is leaking from the filling nozzle itself (for example, dripping between fill cycles or after a fill), the issue is likely in the filling valve or nozzle assembly. A worn-out nozzle or a damaged seal can allow water to escape, leading to drips or even a steady leak. This not only wastes product but also makes the machine and floor wet.
How To Fix: Inspect the filling nozzles for any visible damage or wear. Often, the rubber or plastic tip of the nozzle can degrade over time or get nicked, causing a leak. Replace the nozzle if it is worn out. If the nozzle itself looks fine, the problem might be with the valve inside the nozzle. Disassemble the nozzle assembly and check the internal seals, O-rings, or valve seats. Rebuild or replace any faulty seals. In some cases, the nozzle might be slightly misaligned or loose – tightening the nozzle or adjusting its position can stop the leak. Regularly cleaning the nozzle can also help, as debris or residue buildup can cause a valve to not seat properly and lead to leaks.
2. Loose Caps (Under-tightening): One of the most common reasons bottles leak after capping is that the caps are not applied tightly enough. If a cap is too loose, water can seep out around the cap or even cause the cap to fall off during handling. Under-tightening can occur if the capping machine’s torque setting is too low or if there is an issue with the capping heads not applying enough pressure.
How To Fix: First, check the torque setting on your capping machine and increase it if necessary to ensure a secure seal. Torque is the measure of how much rotational force is used to tighten the cap. Refer to the machine’s manual or guidelines to find the recommended torque for the type of cap and bottle you are using. Make sure the machine is actually applying that torque (some machines have a torque tester to verify this). If the setting is correct but caps are still loose, inspect the capping heads or chucks for wear – worn grippers might not be holding the cap properly during tightening. In that case, replace the worn components. Also, ensure that the caps you are using are compatible with the machine and are not too large or too small for the bottle. Using the correct cap and torque combination will usually eliminate leaks due to loose caps.
3. Overtightened Caps: Surprisingly, caps that are too tight can also cause leaks. If a cap is over-tightened, it can crack the bottle’s neck or distort the cap’s seal, leading to micro-fractures or gaps that allow water to escape. Overtightening might happen if the torque setting is too high or if the machine has a fault causing it to apply excessive force.
How To Fix: Reduce the capping torque to a level that securely seals the cap without damaging the bottle. It may take some trial to find the sweet spot where the cap is tight enough to not leak, but not so tight that it risks breaking the bottle. If the machine allows, use a torque tester to measure the actual torque being applied and adjust accordingly. Also, check if the bottle neck can withstand the current torque – if you notice any neck cracks or cap deformation, it’s a sign to reduce the torque. Properly set torque will ensure a leak-proof seal without the risk of overtightening damage.
4. Cap Sealing Liner Issues: Sometimes, the cap itself might be the culprit. Caps often have a liner (a plastic or foam seal) inside that creates the seal on the bottle. If this liner is missing, damaged, or not making full contact, leaks can occur even if the cap is properly tightened. For example, a cap with a torn liner will leak, as will a cap that is cross-threaded (put on askew).
How To Fix: Inspect a sample of caps to ensure the liners are intact and present. If you find any caps with missing or damaged liners, switch to a new batch of caps. Ensure caps are not being reused or mishandled in a way that could damage the liner. Also, make sure the capping machine is not applying the cap in a way that damages the liner – some machines have features to align and seat the cap gently before tightening. If cross-threading is an issue, check the cap alignment and the machine’s cap tightening mechanism (for example, on a spindle capper, ensure the spindle wheels are aligned correctly on the cap). Using quality caps and ensuring they are properly seated will go a long way in preventing leaks due to cap liner problems.
5. Bottle Neck Defects: In some cases, the bottle itself is the source of the leak. A bottle with a chipped, cracked, or otherwise imperfect neck finish will not provide a good surface for the cap to seal against. Even a small crack can allow water to seep out, and a rough or uneven neck might prevent the cap from sealing properly.
How To Fix: Remove any bottles with visible neck defects from the production line. If you notice a recurring issue with a particular batch of bottles, it might indicate a problem in the bottle manufacturing process (for example, the mold is worn and creating imperfect necks). In that case, work with your bottle supplier to improve the bottle quality. On the machine side, ensure that the caps are not being forced onto bottles with extreme force that could damage them – a properly adjusted capping machine should not be cracking bottle necks. Also, consider if the bottles are being subjected to any impacts or stress after filling (for example, during conveyance or packing) that could cause cracks. Addressing the bottle quality and handling will eliminate leaks caused by bottle defects.
6. Product Residue on Bottle Threads: If water from the filling process drips onto the bottle’s neck or threads, it can interfere with the capping process. A wet or slippery bottle neck can prevent the cap from gripping and sealing correctly, leading to leaks. This often happens if the filling nozzles are dripping excessively or if bottles are overfilled, causing water to spill onto the neck during the capping stage.
How To Fix: First, address any nozzle dripping issues (as discussed in the “Inconsistent Fill Levels” section) to ensure the filling process is clean and precise. Make sure the filling nozzles are not dripping after each fill cycle. You can also install drip trays or use a nozzle with an anti-drip feature to catch any stray drops. Additionally, check that the conveyor and any bottle guides are dry and not spreading water onto the bottle necks. If necessary, add a brief air blow or rinse step before capping to dry the bottle necks. Ensuring the bottle neck and threads are dry and clean when the cap is applied will help the cap seat properly and create a leak-free seal.
Machine Downtime and Slow Production Speed – Common Culprits and Fixes
Unplanned machine downtime and a gradual slowdown in production speed can be just as detrimental to a bottling operation as a complete breakdown. When a machine frequently stops or runs significantly slower than its rated capacity, it eats into profits and can lead to missed delivery dates. There are many reasons why a bottling machine might experience downtime or reduced speed – some are mechanical, some electrical, and others process-related. The frustration of a machine that “just isn’t running right” is compounded by the pressure to get production back on track.The good news is that many of the causes of downtime and slow speed are preventable or easily corrected with some troubleshooting and maintenance. By systematically identifying the issue, you can get your machine running at full speed again. Below are some common problems that lead to downtime or reduced production speed and the steps you can take to resolve them.
1. Machine Not Starting or Sudden Stops: If the bottling machine fails to start or stops mid-production, it can bring everything to a halt. This issue is often related to electrical or safety system faults. For example, a tripped circuit breaker, a loose power connection, or a blown fuse can prevent the machine from powering up. Safety interlocks might remain engaged if an access panel or emergency stop button hasn’t been reset properly. In other cases, the machine might start but then stop abruptly – this could be due to a fault detection (such as a sensor seeing something wrong) or an overload situation.
How To Fix: First, check the basics: ensure the main power switch is on, and reset any tripped breakers or replace any blown fuses. Verify that all safety doors, panels, and emergency stop buttons are in the correct position. If the machine has a display, note any error codes or messages – these can point to the problem. For instance, an error like “Air Pressure Low” or “Sensor Fault” will indicate which system to check. Clear the error and reset the machine once the issue is resolved. If the machine still won’t start, inspect the electrical components for any signs of damage (burnt wires, failed contactors, etc.). In some cases, the problem might be with the machine’s control system (PLC or relays) – ensure they are functioning correctly. Addressing the root cause of the startup or stop fault will get the machine running again. It’s also a good idea to keep spare fuses and contact relays on hand so you can quickly replace any that fail.
2. Air Pressure or Pneumatic Issues: Many functions of a bottling machine (such as valve actuation, capping head movement, or bottle ejection) are powered by compressed air. If the air pressure drops below the required level, the machine may slow down or stop altogether to prevent damage or errors. Low pressure can cause valves to open slowly, cylinders to move sluggishly, or the machine to trigger a low-pressure safety shutdown.
How To Fix: Check the air pressure gauge on the machine or the main air supply. If it’s below the recommended range, increase the air supply pressure or investigate why pressure has dropped (for example, a leak in the air lines or a problem with the air compressor). Make sure all air filters and dryers are clear – a clogged filter can restrict airflow and reduce pressure. Also, ensure that any pneumatic valves are fully opening and closing. If the machine has an air pressure sensor, verify it is working correctly – sometimes a faulty sensor can cause the machine to err on the side of caution and stop. Maintaining a steady supply of clean, dry air at the correct pressure is crucial for the machine to operate at its intended speed.
3. Worn or Faulty Sensors: Sensors play a big role in automating the bottling process – they detect bottle presence, fill levels, cap placement, and more. If a sensor is dirty, misaligned, or malfunctioning, the machine might not receive the correct signal to proceed, leading to pauses or slower operation as the machine tries to compensate. For example, a faulty bottle presence sensor might cause the machine to wait longer for a bottle that isn’t there, or a misaligned fill level sensor might cause the machine to repeatedly retry filling, effectively reducing speed.
How To Fix: Inspect all critical sensors on the machine. Clean any that are dirty or obstructed (for instance, a photoelectric sensor with dust on its lens might not detect bottles accurately). Check the alignment of each sensor – ensure it is positioned to properly “see” what it needs to detect. If a sensor is damaged or giving false readings, it will likely need to be replaced. Sometimes, a simple adjustment of the sensor’s sensitivity or position can solve the problem. Also, make sure the sensor cables and connections are secure – a loose wire can cause intermittent faults. Keeping sensors in good working order will prevent the kind of erratic behavior that slows down or stops the machine.
4. Electrical Control System Faults: The machine’s control system (often a PLC, or programmable logic controller) orchestrates all the sequences and timing. If there’s an issue in the control system – such as a program glitch, a faulty relay, or a problem with the human-machine interface (HMI) – the machine may behave unpredictably or halt. Modern bottling machines are quite complex, and even a small software error or a stuck relay can cause a system-wide stop.
How To Fix: If you suspect a control system issue, first try resetting the machine (turn it off and wait a few seconds before turning it back on). This can sometimes clear a temporary glitch. Check the HMI for any error messages or alarms that indicate which part of the system is faulting. If a specific error code is displayed, consult the machine’s manual or technical support for guidance on resolving it. Ensure that all the relays and contactors in the control panel are functioning – listen for any that are chattering (constantly clicking on and off), which can indicate a problem. In some cases, you might need to reload the machine’s software or firmware if it’s become corrupted. It’s wise to keep a backup of the machine’s program and settings. If you’re not experienced with the control system, this might be a job for a qualified technician. Resolving any control system faults will get the machine running reliably again.
5. Mechanical Wear or Damage: Over time, the moving parts of a bottling machine can wear out or break, which can lead to slowdowns or stops as the machine struggles to operate properly. Worn bearings, belts that are slipping or off-track, gears that are grinding, or chains that are loose can all reduce the machine’s efficiency and even cause safety shutdowns if a fault is detected. Sometimes a mechanical issue might not stop the machine but will cause it to run slower – for example, a worn conveyor belt drive might not move bottles at the set speed.
How To Fix: Perform a thorough inspection of the machine’s mechanical components. Look and listen for signs of wear or damage: unusual noises, vibration, or parts that are hot to the touch can indicate a problem. Tighten any loose bolts or fasteners and lubricate all moving parts as recommended by the manufacturer. Replace any parts that are worn out or broken – for instance, a worn belt, a damaged bearing, or a stretched chain should be replaced promptly to prevent further issues. Ensure that all guards and safety devices are in place and functioning, as sometimes a machine will stop if it detects a safety issue (like a guard being open). Regular preventive maintenance (which we’ll discuss in the next section) is key to catching mechanical problems before they cause downtime. By keeping the machine’s mechanical system in good shape, you can maintain its speed and reliability.
6. Overloading or Incorrect Settings: Sometimes, the machine itself is fine, but it’s being pushed beyond its capabilities or set up incorrectly. If you try to run the machine at a speed higher than it’s designed for, or if you try to fill/cap a product or container that the machine isn’t suited for, it can lead to issues. For example, using a machine rated for 5000 bottles per hour (BPH) and trying to run it at 6000 BPH might cause it to frequently jam or overheat, or simply not keep up. Similarly, if the machine is set up with the wrong parameters (like a fill time that’s too short for the volume, leading to underfilled bottles triggering a fault), it will struggle.
How To Fix: Make sure you are operating within the machine’s design specifications. Check the manual or the machine’s data plate for the maximum rated speed and other limitations. If you need higher output, you might need a faster machine or to run two lines. Adjust the machine’s settings to match the product and container you are using. This might involve increasing fill times, adjusting sensor settings, or changing timing. It’s also important to ensure the product supply (water in this case) can keep up with the machine’s speed – a lag in supply can cause the machine to wait and slow down. Optimizing the setup for your specific production needs will help the machine run smoothly and at its best speed.
Capping Issues – Loose or Misaligned Caps and How to Resolve Them
Properly capping each bottle is critical for product quality and safety. If caps are loose or not seated correctly, it can lead to leaks (as discussed earlier) or even contamination. Misaligned caps – caps that are crooked, askew, or not centered on the bottle – are not only unsightly but also indicate a problem in the capping process. Customers expect a uniform, professional-looking product, and crooked caps can undermine confidence in your brand. Moreover, a cap that’s not on straight might not seal properly, increasing the risk of leakage or tampering. Addressing capping issues promptly is important to maintain a high-quality bottling operation.Most capping issues fall into two categories: caps that are too loose (under-tightened) and caps that are not aligned correctly (misaligned). Both can usually be traced back to a few common causes. Let’s examine these issues and the solutions to fix them so that every bottle leaves your line with a secure, straight cap.
1. Loose Caps (Under-tightening): If caps are coming off bottles too easily or are noticeably loose, the capping machine is not applying enough torque. Under-tightening can happen for a number of reasons. The torque setting on the capping head might be too low for the type of cap or bottle being used. Alternatively, the capping head or gripper mechanism could be worn – for example, on a spindle capper, the spindle wheels or belts might be worn and not gripping the cap properly to tighten it effectively. Another possibility is that the caps themselves are the wrong size or material, making them hard to grip or too slippery.
How To Fix: Start by checking and adjusting the torque setting. Increase the torque gradually (if the machine allows incremental adjustment) and test a few bottles to see if the caps are now tight enough. Be careful not to overtighten (as we’ll discuss next). If adjusting torque doesn’t solve the problem, inspect the capping mechanism for wear. On a chuck capper, ensure the chuck jaws or inserts are not worn out – replace them if they are. On a spindle capper, check the condition of the spindle wheels and the gripper belts. Worn spindle wheels or belts can slip on the cap and not apply enough rotation force. Replace any worn components. Also, verify that the caps being used are compatible with the machine. For instance, if the caps are too large in diameter, the capping heads might not be able to grip them correctly. Switching to the correct cap size or type can resolve grip issues. By ensuring the capping machine has the right torque and is in good working order, you can eliminate loose caps.
2. Overtightened Caps (Crushing or Breakage): On the flip side, if caps are applied too tight, it can cause the bottle neck to crack or the cap itself to deform or break. Overtightening often happens when the torque setting is too high or if there’s a fault in the capping machine causing it to apply excessive force (for example, a capping head that comes down too far and keeps tightening). Caps that are too tight can also be difficult for consumers to open, which is a quality issue.
How To Fix: Reduce the capping torque to a level that securely seals the cap without damaging the bottle or cap. If the machine has a torque limiter or adjustment, dial it down. It may take some trial to find the optimal torque where the cap is tight enough to not leak, but not so tight that it risks cracking the bottle. Also, check if the machine is applying the cap in a way that could crush it – for instance, on a screw-cap capper, ensure the head isn’t coming down with too much vertical force. Sometimes, a mechanical adjustment (like a spring tension or a pressure setting) can help. If the machine is consistently overtightening caps, it might indicate a problem with the torque control system (if equipped) – have a technician check its calibration. Properly set torque and a gentle capping motion will give you a secure seal without the risk of damage.
3. Misaligned or Crooked Caps: Caps that are not centered on the bottle or are installed at an angle can occur for several reasons. One common cause is that the bottles themselves are not aligned correctly under the capping head – if a bottle is slightly askew when the cap is applied, the cap will end up crooked. This can happen if the conveyor or bottle in-feed isn’t delivering bottles straight, or if there’s a timing issue (the capping head descends before the bottle is fully seated). Another cause could be the cap feeder or orienter – if caps are not being presented to the capping head in the correct orientation (for example, a cap is slightly tilted as it’s picked up), it can lead to a misaligned cap. Additionally, on certain capping machines, the mechanism that holds the bottle during capping (such as a bottle guide or a neck ring) might be out of adjustment, allowing the bottle to shift during capping.
How To Fix: First, ensure the bottles are being fed to the capping station straight and consistently. Adjust the conveyor guides or the timing of the bottle in-feed to eliminate any wobbling or misalignment of bottles before they reach the capper. If the machine has a bottle necking or positioning device, check that it is holding the bottle steady. Next, inspect the cap feeder and any cap orienting components. Make sure caps are being oriented correctly (for example, for a screw cap, ensure the threads are aligned as the cap is picked up). Some machines have sensors or sorters to ensure caps are aligned – if your machine has these, verify they are working. If caps are frequently getting crooked, consider adding or adjusting a cap alignment system to guide caps into the correct orientation before capping. Finally, check the capping head itself – if it’s a spindle capper, ensure the spindle wheels are centered on the cap. If it’s a chuck capper, make sure the chuck is descending straight and not at an angle. Sometimes a simple adjustment of the capping head’s position or alignment can fix crooked caps. By aligning both the bottle and the cap delivery, you can achieve straight, properly seated caps every time.
4. Cap Feeding Issues: If caps are not being fed to the capping head reliably – for example, the cap hopper is emptying frequently, or caps are getting stuck in the chute – this can cause the capping process to pause or lead to issues like a cap being applied late or not at all. Cap feeding problems can stem from a faulty cap feeder mechanism, caps of the wrong size or shape, or debris in the cap track.
How To Fix: Check the cap hopper and feeder for any obstructions or wear. Clear any stuck caps and ensure the feeder is dispensing caps smoothly. If the feeder is vibrating or using air to move caps, adjust the settings to improve cap flow. Inspect the caps themselves – ensure they are not deformed or too large/small for the feeder tracks. Sometimes a cap with a slightly different shape (like a taller cap) can cause feeding issues. If needed, adjust the feeder’s guides or change parts to accommodate the cap. Also, make sure the cap hopper is being replenished regularly to avoid running out of caps mid-production. A steady, reliable feed of caps is essential for consistent capping. By troubleshooting the cap feeding system, you can prevent pauses and ensure a cap is always ready when the bottle is in position.
5. Worn or Faulty Capping Heads: Over time, the capping heads or chucks can wear out, which affects their ability to grip and apply caps correctly. For example, on a rotary capping head, the gripping fingers or inserts might become worn and not hold the cap securely during tightening. On a spindle capper, the spindle wheels can wear down and not grip the cap’s surface effectively, leading to slipping. Worn parts can cause both loose caps (if the grip is insufficient) and misaligned caps (if the cap isn’t held steady).
How To Fix: Inspect the capping heads for wear. Look for signs like worn gripping surfaces, cracks, or excessive play in the mechanism. Replace any worn components – many machines have replaceable inserts or pads for this very purpose. Lubricate any moving parts of the capping head (as recommended by the manufacturer) to ensure smooth operation. If the capping head is adjustable (for example, tension springs on the grippers), make sure they are set correctly to provide a firm grip. Regularly checking and maintaining the capping heads will ensure they continue to perform well. It’s also a good idea to keep spare capping head parts on hand so you can replace them quickly when needed, minimizing downtime.
Contamination Risks in the Rinsing System – Identifying and Eliminating Them
Contamination in the rinsing system of a bottled water production line is a serious concern. If bottles are not properly cleaned and sanitized before filling, it can compromise the safety and quality of the product. Contaminants such as dust, debris, or even bacteria can remain on or in the bottles, leading to off-flavors, cloudiness, or in the worst case, a health hazard. A single contaminated bottle can undermine the integrity of an entire production batch and potentially trigger a product recall. Therefore, it’s crucial to ensure the rinsing stage is effective and free from issues that could introduce contamination.Most rinsing systems in modern bottling lines use a combination of water and sometimes air to clean the inside of bottles. Common issues that can lead to contamination include inadequate filtration of the rinse water, bacterial growth in the water system, or simply not following proper cleaning and sanitation procedures. Let’s explore these contamination risks in more detail and discuss how to identify and eliminate them to keep your bottling line hygienic.
1. Poor Water Filtration: The rinse water must be filtered to remove any particles, sediment, or impurities that could be deposited onto the bottles. If the filtration system is not functioning properly – for example, the filters are clogged or not the correct micron rating – contaminants can pass through and end up in the bottles. Even seemingly small particles can cause cloudiness or off-tastes in the bottled water, and larger debris could be a safety concern.
How To Fix: Regularly check and replace the filters in the rinsing system. If you notice any particles or sediment in the rinse water, change the filters immediately. It’s wise to establish a preventive maintenance schedule for filter changes based on the quality of your water source and production volume. Ensure the filtration system is rated for the level of purity you need – for example, using a 5-micron or finer filter if necessary. In some cases, you might need multiple stages of filtration (like a sediment filter followed by a carbon filter) if your water has specific contaminants. By keeping the rinse water clean, you prevent contaminants from being introduced in the first place.
2. Bacterial Growth in the Water System: Stagnant or untreated water in the rinsing system can become a breeding ground for bacteria and mold. Even though you are filling bottled water (which is usually disinfected), the rinse water itself could harbor microbes if not managed. Bacterial growth can occur in any part of the system where water sits for a long time – for instance, in a storage tank or in the lines between uses. If bacteria are present, they can be transferred to the bottles during rinsing, potentially causing product spoilage or health issues.
How To Fix: Implement a regular sanitization cycle for the rinsing system. Many bottling lines have a Clean-in-Place (CIP) system that circulates a sanitizing solution (like a mild peracetic acid or chlorine solution) through the rinsing circuit. Run this cycle as often as recommended – typically at the end of each production day or at least weekly, depending on usage. Ensure the sanitizing solution is at the correct concentration and contact time to effectively kill any bacteria. Also, try to avoid letting water sit stagnant in the system for extended periods. If the line is not going to be used for a while, drain the water or circulate a sanitizing solution before storing it. Some systems also use UV sterilizers or ozone to continuously disinfect the rinse water – if your system has these, make sure they are functioning. By keeping the rinse water and system sanitized, you eliminate the risk of bacterial contamination.
3. Improper Cleaning Cycles: Sometimes, the issue isn’t with the water itself but with the cleaning process not being thorough. If the rinsing machine is not cleaned or purged correctly between production runs, residues from previous products (if you’re doing different products) or biofilms can build up and contaminate the next batch. Even in a pure water filling line, a lack of regular cleaning can lead to a gradual buildup of mineral scale or algae in the nozzles or tanks, which then can slough off into the bottles.
How To Fix: Follow a strict cleaning and sanitation schedule for the rinsing machine. This should include purging the system with clean water, running a sanitizing solution, and then a final rinse with clean water to remove any sanitizer residue. Make sure to clean all parts that come in contact with the water or bottles – nozzles, tanks, pipes, and any filters. Pay special attention to the nozzles – disassemble and clean them if necessary to remove any buildup. Also, ensure the machine’s exterior and any areas where bottles are handled are kept clean to prevent cross-contamination. By properly cleaning the rinsing system, you prevent any residues or microorganisms from carrying over to your product.
4. Bottle Quality and Handling: The condition of the bottles before they even reach the rinsing stage can impact contamination. Bottles that are stored uncovered can collect dust and debris on their exteriors or even have contaminants inside if they were not properly sealed after manufacturing. If these dirty bottles are then rinsed, the rinsing process might not be enough to remove all the contaminants, especially if the bottles are very dirty. Additionally, if bottles are mishandled and caps are removed (for instance, caps falling off and the bottle being open to the environment), they can get contaminated.
How To Fix: Ensure bottles are stored in a clean, covered environment before use. If possible, keep them in their original packaging until they go onto the line. Inspect bottles as they are loaded onto the conveyor – if any look excessively dirty or have open caps, remove them. You might also consider an additional pre-rinse or air blow step for the outside of bottles if dust is a persistent issue. On the handling side, make sure any conveyors or equipment that the bottles travel on are clean and not introducing dirt. For example, clean conveyor belts and guides regularly to remove any dust or residue. By starting with clean bottles and handling them hygienically, you reduce the load on the rinsing system and prevent contamination from the bottle itself.
5. Water Quality Issues: The source of the rinse water itself could be a source of contamination if it’s not up to standards. If the water has high levels of bacteria, sediments, or chemicals, the rinsing process could actually be adding contaminants rather than removing them. For example, using water that hasn’t been properly treated or filtered could introduce bacteria or off-tastes.
How To Fix: Test the rinse water quality regularly. If you are using the same water as the product (which is common), ensure it meets your product’s purity standards. If you are using a different water source for rinsing (like tap water), it should at least be filtered and perhaps treated to ensure it’s clean. In some cases, you might need to install a water treatment system for the rinse water (such as a UV sterilizer or additional filtration). Also, be mindful of the water’s chemical composition – for instance, water with a high mineral content might leave scale or deposits. Using purified water (like deionized or RO water) for rinsing can eliminate many water quality issues. By controlling the water quality, you ensure that the only thing the rinsing process introduces to the bottles is cleanliness.
Conclusion – Keep Your Bottling Line Running Smoothly
A rinsing, filling, and capping 3-in-1 bottled water filling machine is a complex piece of equipment, but by understanding its common problems and how to address them, you can ensure it operates at its best. Throughout this guide, we’ve covered issues like inconsistent fill levels, bottle jams, leaks, machine downtime, capping problems, and contamination risks. We’ve also provided practical solutions for each, emphasizing preventive maintenance and proactive troubleshooting. The key takeaway is that most problems can be prevented or quickly fixed with regular care and attention. By implementing a routine maintenance schedule, training operators well, and keeping detailed records, you can extend the life of your machine and avoid costly breakdowns. Remember, a well-maintained machine not only runs smoother but also produces higher quality products and saves you money in the long run. Keep these tips in mind, and you’ll be well on your way to keeping your bottling line running smoothly and efficiently, delivering safe, high-quality bottled water to your customers every time.Union Machinery has been engaged in food machinery customization services since its establishment in 2014, according to customer needs for you to tailor suitable machinery and equipment, for more product information, please refer to: Bottled Water Filling Machine;More video information see view: Bottled Water Production Line 、PET Bottled Water Production Line. Our expertise and advantages will bring you more opportunities and development space.
For personalized, industry-tailored advice and to explore state-of-the-art solutions, please don't hesitate to contact us at info@unmachinery.com
The following is other knowledge related to Bottled Water Filling Production Line that I have summarized based on long-term work experience, for your reference. I hope it will be helpful to you.
1.How to Design a PET Bottled Water Production Line?
2.How is PET bottled purified water filled?
3.What Are the Advantages of 3-in-1 Bottled Water Filling Machines?
Product List
HOT PRODUCT